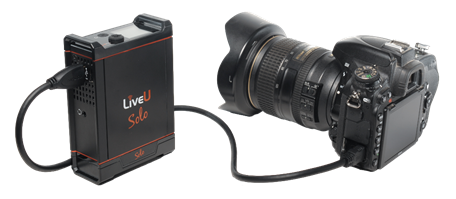
Connecting the Video Camera
To connect the camera, Connect one end of the cable to the video out port on the video camera, and the other end of the cable to the appropriate port (SDI or HDMI) on the Solo unit.
The camera can be connected either before or after turning on the unit. If you power on the Solo before connecting the camera, then the message No Camera is displayed. You can then connect the camera, as described above. Only one camera can be connected directly to the Solo at any time (i.e. connecting a camera to the SDI interface as well as a different camera to the HDMI interface will not work)

The Solo is provided with a pouch, however, when removed from the pouch, it can be mounted on your camera using the separately available camera mount.
Which camera resolutions are supported?
Supported input resolutions and framerates:
- 1080p60/59.94/50/30/29.97/25/24
- 1080i60/59.94/50
- 720p60/50/30/25/24
- SD NTSC
- SD PAL
Supported output resolutions and framerates:
- 1080p60/59.94/50/30/29.97/25/24
- 720p60/50/30/25/24
- 480p
Important note: the LiveU Solo will not change frame cadence if it means creating new frames, and will not convert between dropframe (59.94/29.97) and non-dropframe cadences (60/30). The Solo will output what is input in such cases. For example, if you input 1080p59.97, and request 1080p60 output, the Solo will output 1080.p59.94. This also means that if your input uses 24p frame cadence, the only cadence the LiveU Solo will output is also 24p (since all other cadences would require conversion). LiveU Solo is capable of deinterlacing including to the same cadence, so 59.94i can be converted to 59.94p. LiveU Solo only supports progressive output, all interlaced input will be deinterlaced.
Comments
0 comments
Article is closed for comments.