LiveU Solo Interface
Once the LiveU Solo is powered on and ready for work, the Home screen displays.
The Main screen provides access to the various configuration options for the LiveU Solo.
To go from the Home screen to the Main screen:
Press the Right button or the Center (OK) button on the joystick.
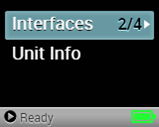
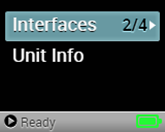
When moving from the Home screen to the Main screen, the Interfaces option is initially selected, as shown above. The selected option is highlighted in gray on the screen.
To select an option on the Main screen, use the Up and Down buttons on the joystick to navigate to the applicable option. Then, press the Right or Center (OK) button on the joystick to access that option’s configuration screen. A white arrow next to an option on the Main screen indicates that the option has a sub‑menu and that you need to press the Right or Center (OK) button to access the sub-menu screen.
The following example shows how to access the Interfaces screen from the Main screen.
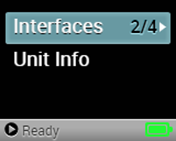
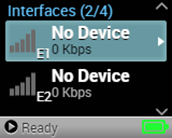
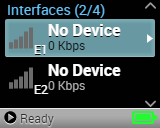
When additional options are available in the Main screen, up and/or down arrows are shown on the screen. These arrows indicate to you to move up and down on the screen (using the Up and Down buttons on the joystick), in order to navigate to a different option on the Main screen that is not seen on the screen.
|
NOTES |
Pressing the joystick’s Left button returns to the previous screen. Pressing the joystick’s Right or Center (OK) buttons moves to the next screen. From the Home screen, the next screen is the Main screen. |
Interfaces
The Interfaces option in the Main screen indicates the number of active interfaces out of the total number of interfaces on the LiveU Solo. In the example to the left, 4/4 means that there are four active interfaces out of the four total interfaces on the unit (2 x cellular, 1 x WiFi and 1 x Ethernet network interface).
The LiveU Solo can connect and use up to 4 network interfaces as shown below.
- 2 x USB-connected modems, that are shown in ports E1 and E2.
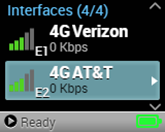
These Cellular interfaces show the port number, RSSI signal strength bars, the dialed cellular network name and the uplink bandwidth (in Kbps) currently being used. In addition, each cellular interface shows the cellular operator’s technology currently in use (3G or 4G) before the cellular network name.
Once a cellular USB dongle (that contains a valid and working data SIM) has been connected to either (or both) these ports, the Solo will automatically dial and connect the dongle, updating the information accordingly.
- 1 x WiFi interface, as identified by the

The WiFi client interface shows the selected WiFi network SSID, RSSI signal strength bars and the uplink bandwidth (in Kbps) currently being used.
A secured WiFi network will display the  icon and an unsecured WiFi network displays the
  icon.
icon.
- 1 x LAN interface, as identified by the

The LAN interface shows the DHCP-received IP address. In addition, it shows the uplink throughput (in Kbps) currently being used.
You can enable or disable one (or even all) of the LiveU Solo interfaces. Each interface must be enabled/disabled separately. The examples below describe how to enable/disable cellular modem interfaces. These procedures are the same for all interface types (cellular modems, WiFi and LAN interfaces).
To disable an interface
|
· Navigate to the Interfaces option in the Main screen using the Up and Down buttons on the joystick. |
|
|
· Press the Right or Center (OK) buttons on the joystick. The Interfaces screen displays |
|
|
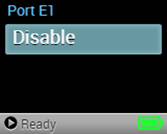
· Navigate to an interface using the Up and Down buttons on the joystick and press the Right or Center (OK) buttons to display the following screen: |
|
|
· Press the Right or Center (OK) buttons on the joystick to disable the selected interface. The following screen displays: |

|
|
· Select Disable and press the Center (OK) button to disable the interface. The Disable button of the interface changes to Enable, indicating that the interface is currently disabled. |
|
To enable an interface
|
· Navigate to the Interfaces option in the Main screen using the Up and Down buttons on the joystick. |

|
|
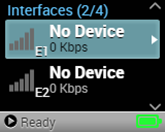
· Press the Right or Center (OK) buttons on the joystick. The Interfaces screen displays |
|
|
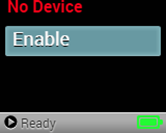
· Navigate to a disabled interface using the Up and Down buttons on the joystick and press the Right or Center (OK) buttons |
|
|
· Press the Right or Center (OK) buttons on the joystick to disable the selected interface. The following screen displays: |

|
|
· Select Enable and press the Center (OK) button to enable the interface. The Enable button of the interface changes to Disable, indicating that the interface is currently enabled. |
|
Configuring WiFi
To configure WiFi on the Solo
|
· Navigate to the Interfaces option in the Main screen using the Up and Down buttons on the joystick. |

|
|
· Press the Right or Center (OK) buttons on the joystick. The Interfaces screen displays |

|
|
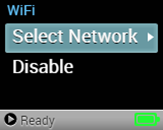
· Select WiFi â Select Network.
|
|
|
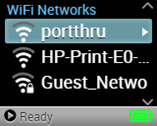
· The unit scans and displays the available networks. |
|
|
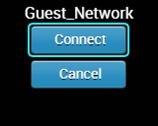
· Select a network and press Connect. |
|
|
NOTE |
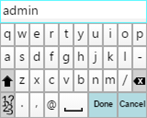
For encrypted networks, select the network, press Connect, enter the network password using the virtual keyboard, as shown below, and then press Done. |
Disconnecting a WiFi Network
To disconnect a WiFi network, either disable WiFi or select a different network.
The LAN Interface
The LAN adapter included in Solo is configured to use DHCP. If for any reason you wish to disable this network connection
Comments
0 comments
Article is closed for comments.